
De consequentie van de nieuwe stringentere [2022] beveiliging van de browsers is een foutmelding: Your connection is not private.
(zie: netwerk)
Doordat het certificaat van Domoticz niet bekend is in de Chrome of Firefox browsers, moet een "insecure" verbinding ingesteld worden.
 Anno 2022 (en 2021): nieuwe versies van Debian en Domoticz!
 Anno 2022: nieuwe versies van Debian en Domoticz geven een probleem met de default versie 3 van Python!
De consequentie van de nieuwe versie van Python is, dat het watermeter script niet meer werkt.
Het lukte niet om dit script werkend te krijgen, Python 2.7 geïnstalleerd, "environment" aangepast.
Ook een Python utility 2to3 om het oude script aan te passen naar Python 3 werkte niet.
DUS: uiteindelijk weer een oude image van de Raspberry Pi ("Debian-Buster") op de microSD kaart geflasht.
Zie nieuw hoofdstuk: her-installatie
Een bekend gezegde...
![]() if it ain't broken, don't fix it
if it ain't broken, don't fix it
![]() als het niet kapot is, repareer het dan niet
als het niet kapot is, repareer het dan niet
Als "web-server" heb ik gekozen voor de Raspberry Pi Zero Wireless.
Van de website is een "lite" = "minimum" image gedownload van het operating systeem.
Deze minimum uitvoering wordt "headless" gebruikt, zonder beeldscherm, keyboard en muis.
Voor de setup zijn wat extra stappen nodig om deze Raspberry Pi bij het opstarten verbinding te laten maken met het lokale WiFi netwerk.
De Raspberry Pi Zero wordt als controller gebruikt voor Domoticz.
Het voordeel van Domoticz is, dat deze ook op de Pi Zero werkt.
Een uitgebreide introductie van de Raspberry staat op de Wikipedia: Raspberry Pi
Een Introductie van de Raspberry Pi Wireless staat op de site
Raspberry Pi: Introducing Raspberry Pi Zero W:
The Raspberry Pi Zero has proven to be one of the most popular and sought-after versions of the Raspberry Pi since it came out in November 2015. However, many people thought it lacked one very important feature: inbuilt wireless internet. As of today [maart 2018], the Pi Zero lacks it no more: let us introduce you to Raspberry Pi Zero W.
In mijn geval is de pi-zero gemonteerd in de meterkast bij de FRITZ!Box modem.
Zowel de elektriciteits meter als de watermeter zijn direct op de pi-zero aan te sluiten.
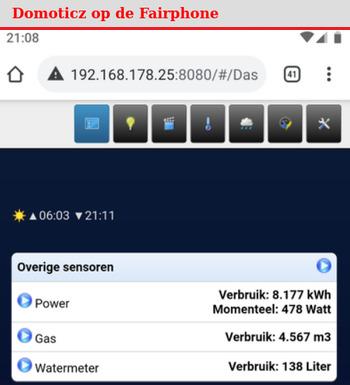
De gegevens van deze meters zijn direct zichtbaar op een Chromebook of op de Fairphone smart phone!
 Een overzicht van alle Raspberry Pi's staat op de pagina:
ComputerTotaal: Welke Raspberry Pi kun je het beste kopen?
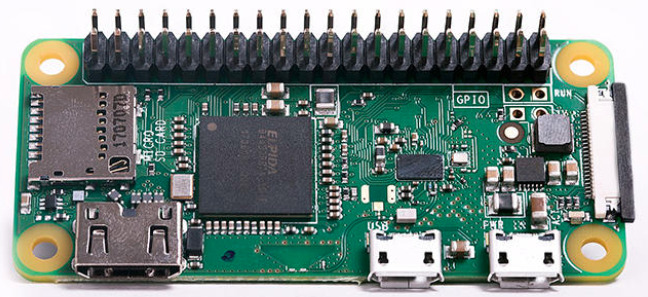
De Raspberry Pi Zero WH is met een afmeting van 6,5 bij 3 centimeter het kleinste ontwikkelboard met GPIO aansluitingen.
De processor is een single core 1 GHz en het geheugen is 512 MB.
De voordelen ten opzichte van het oorspronkelijke Zero-model: De Zero WH wordt geleverd met geïntegreerd WLAN en beschikt bovendien over bluetooth en een camera-aansluiting.
Specificaties:
De grootste troef van de Raspberry Pi Zero WH is het geringe stroomverbruik. Het apparaat verbruikt idle ongeveer 100 mA en in bedrijf maximaal 230 mA. Daarom is het apparaat zeer interessant voor toepassingen die gedurende lange tijd moeten werken, maar waarvoor geen complexe of intensieve rekentaken hoeven te worden uitgevoerd, zoals bij voorbeeld een weerstation, een temperatuurmeter of een bewegingsmelder.
Dankzij zijn compacte afmeting, het geringe stroomverbruik en het geïntegreerde WLAN heeft de Raspberry Pi Zero WH zich ontwikkeld tot de ideale basis voor Smart Home-toepassingen.
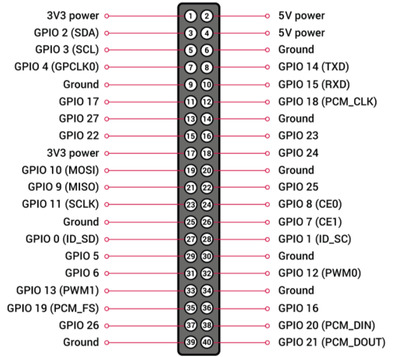
Opmerking: Hoewel de voeding van de Raspberry Pi 5 Volt is, zijn de I/O pins beperkt tot 3,3 Volt.
raspberrypi.org: General Purpose Input/Output pins on the Raspberry Pi ... Connection of a GPIO to a voltage higher than 3.3V will likely destroy the GPIO block within the SoC.

Om de veiligheid van de Raspberry Pi te verhogen, in de default gebruiker "pi" en het wachtwoord "raspberry" uitgeschakeld.
Belangrijk: Headless setup For people who run their Raspberry Pi headless and therefore cannot work through the wizard, the Raspberry Pi Imager tool allows you to preconfigure an image with a user account; when an image created like this is first booted, it will come straight up in the desktop, logged in as the user created in the Imager.
In de plaats daarvan moet tijdens de setup een geruikers naam en wachtwoord ingesteld worden, zie:
Raspberry Pi news: An update to Raspberry Pi OS Bullseye. [7th Apr 2022]
...Up until now, all installs of Raspberry Pi OS have had a default user called "pi". This isn't that much of a weakness...
So with this latest release, the default "pi" user is being removed...

Anno 2022: Voor nieuwe versies van Raspberry Pi OS Kan het beste de "Raspberry Pi Imager" gebruikt worden.
Relevante sites zijn:
- RaspberryPi.org: Raspberry Pi OS software Install Raspberry Pi OS using Raspberry Pi Imager
- Ook nuttig: adafruit.com: Raspberry Pi Zero Headless Quick Start

Raspberry Pi OS is a free operating system based on Debian, optimised for the Raspberry Pi hardware, and is the recommended operating system for normal use on a Raspberry Pi.
Raspberry Pi OS is under active development, with an emphasis on improving the stability and performance of as many Debian packages as possible on Raspberry Pi.
| Hoofdstuk: | Doel: |
|---|---|
| Download | Image voor Pi Zero, installatie op 32 GB microSD card |
| Configuratie | Aanpassingen voor headless boot: SSH enable, WiFi netwerk configuratie |
| Eerste boot | Configuratie tool: "raspi-config" uitvoeren Onderdeel van de eerste boot is het aanpassen van het default wachtwoord: SSH is enabled and the default password = 'raspberry' for the 'pi' user has not been changed. This is a security risk - please login as the 'pi' user and type 'passwd' to set a new password.
|
| Aanpassingen | Video uitschakelen, software update en upgrade uitvoeren |
| Netwerk | Wijziging hostname geeft (misschien) foutmelding Chromebook |
Opmerking: De (software) configuratie staat in het bestand: /boot/config.txt
Zie ook: Raspberrypi documentation: config-txt
De download pagina voor de Raspberry Pi Zero 32 bit is
raspberrypi.org: raspberry-pi-os-32-bit
Raspberry Pi OS, Compatible with: All Raspberry Pi models
 In de volgende voorbeelden is de tekst op de prompt in rood weergegeven.
De download van het iso bestand en het configureren van het MicroSD geheugen is op de
"giga" computer uitgevoerd.
De Pi Zero Wireless heeft een 32 bit processor, voor deze chip is een "armhf" versie nodig.
frits@giga: ~/Downloads $ ls -lrt
...
...
-rw-rw-r-- 1 frits frits  455166810 okt 28 15:08  2020-08-20-raspios-buster-armhf-lite.zip
De image file is met "etcher" software geïnstalleerd op een 32 GB microSD card.
Setup Raspberry Pi Zero-Wireless: configuratie WiFi netwerk: dit is nodig voor een eerste boot via het WiFi netwerk.
De Pi werkt "headless", zonder beeldscherm, keyboard en muis.
frits@giga:/media/frits $ ll
totaal 16
drwxr-x---+  4 root  root  4096 okt 28 15:38 ./
drwxr-xr-x   5 root  root  4096 jun 25  2017 ../
drwxr-xr-x   3 frits frits 3584 jan  1  1970 boot/
drwxr-xr-x  21 root  root  4096 aug 20 12:30 rootfs/

frits@giga:/media/frits $ cd boot
frits@giga:/media/frits/boot $ touch ssh
frits@giga:/media/frits/boot $ vi wpa_supplicant.conf
country=us
 ssid="MyNetworkSSID"
 psk="Pa55w0rd1234"
resultaat:
country=nl
update_config=1
ctrl_interface=/var/run/wpa_supplicant

network={
 scan_ssid=1
 ssid="FRITZ!Box"
 psk="WPA-key"
}
Resultaat:
frits@giga:/media/frits/boot $ ls -lrt
-rw-r--r-- 1 frits frits     8427 aug 20 08:56 fixup4x.dat
-rw-r--r-- 1 frits frits     8425 aug 20 08:56 fixup4db.dat
-rw-r--r-- 1 frits frits     5418 aug 20 08:56 fixup4.dat
-rw-r--r-- 1 frits frits     3159 aug 20 08:56 fixup4cd.dat
drwxr-xr-x 2 frits frits    16896 aug 20 12:31 overlays
-rw-r--r-- 1 frits frits     1784 aug 20 12:32 config.txt
-rw-r--r-- 1 frits frits      145 aug 20 12:47 issue.txt
-rw-r--r-- 1 frits frits      169 aug 20 12:47 cmdline.txt
-rw-r--r-- 1 frits frits        0 okt 28 15:41 ssh
-rw-r--r-- 1 frits frits      139 okt 28 16:00 wpa_supplicant.conf
Opmerking: een handige optie bij de FRITZ!Box modems is dat een vast ip adres [hier: 192.168.178.63] aan de computers in het netwerk kan worden ingesteld.
Voorbeeld: FRITZ!Box

Omdat de Raspberry Pi Zero zonder beeldscherm, keyboard en muis werkt, moeten we met een "SSH" verbinding maken via het netwerk.
Een handleiding voor windows staat op de site:
Raspberry Pi: SSH using Windows:
Depending on the version of Windows you are using and what software you have already installed, you may need to download an SSH client.
The most commonly used client is called PuTTY and can be downloaded from
greenend.org.uk: Download PuTTY: latest release
Ik gebruik een Chromebook om in te loggen op de Raspberry Pi!
Connecting to pi@raspberrypi...
The authenticity of host 'raspberrypi (2001:982:1234:1:1234:1234:1234:1234)' can't be established.
ECDSA key fingerprint is SHA256:abcdefghijklmnopqrstuvwxyz1234567890.
Are you sure you want to continue connecting (yes/no/[fingerprint])? yes
Warning: Permanently added 'raspberrypi,2001:982:1234:1:1234:1234:1234:1234' (ECDSA) to the list of known hosts.
pi@raspberrypi's password:
Linux raspberrypi 5.4.51+ #1333 Mon Aug 10 16:38:02 BST 2020 armv6l

The programs included with the Debian GNU/Linux system are free software;
the exact distribution terms for each program are described in the
individual files in /usr/share/doc/*/copyright.

Debian GNU/Linux comes with ABSOLUTELY NO WARRANTY, to the extent
permitted by applicable law.

SSH is enabled and the default password for the 'pi' user has not been changed.
This is a security risk - please login as the 'pi' user and type 'passwd' to set a new password.

pi@raspberrypi:~ $ passwd
Changing password for pi.
Current password: *****
New password: *****
Retype new password: *****
passwd: password updated successfully
pi@raspberrypi:~ $
De volgende stap is het uitvoeren van "raspi-config".
Zie voor handleiding:
RaspberryPi Documentation: raspi-config, This page describes the console based raspi-config application.
Het "raspi-config" programma start een menu systeem om aanpassingen uit te voeren.
De navigatie in het menu is met tab en enter!
Opmerking: In de RaspberryPi Documentation staat bij de "5 Interfacing Options":
In this submenu there are the following options to enable/disable: Camera, SSH, VNC, SPI, I2C, Serial, 1-wire, and Remote GPIO.
Dit is van belang als je een van deze interfaces gebruikt!
Opmerking: in de "headless" versie van de Pi-zero is SSH al werkend, om een remote verbinding te kunnen maken!
Dit is onderdeel van de setup.
pi@raspberrypi:~ $ sudo raspi-config
Raspberry Pi Zero W Rev 1.1

┌────────────────────┤ Raspberry Pi Software Configuration Tool (raspi-config) ├─────────────────────┐
│                                                                                                    │
│        1 Change User Password Change password for the 'pi' user                                    │
│        2 Network Options      Configure network settings                                           │
│        3 Boot Options         Configure options for start-up                                       │
│        4 Localisation Options Set up language and regional settings to match your location         │
│        5 Interfacing Options  Configure connections to peripherals                                 │
│        6 Overclock            Configure overclocking for your Pi                                   │
│        7 Advanced Options     Configure advanced settings                                          │
│        8 Update               Update this tool to the latest version                               │
│        9 About raspi-config   Information about this configuration tool                            │
│                                                                                                    │
│                            <Select>                            <Finish>                            │
└────────────────────────────────────────────────────────────────────────────────────────────────────┘
De optie: 2 Network Options - Configure network settings geeft:
┌────────────────────┤ Raspberry Pi Software Configuration Tool (raspi-config) ├─────────────────────┐
│                                                                                                    │
│           N1 Hostname                Set the visible name for this Pi on a network                 │
│           N2 Wireless LAN            Enter SSID and passphrase                                     │
│           N3 Network interface names Enable/Disable predictable network interface names            │
│           N4 Network proxy settings  Configure network proxy settings                              │
│                                                                                                    │
│                            <Select>                            <Finish>                            │
└────────────────────────────────────────────────────────────────────────────────────────────────────┘
In dit menu is de hostname aangepast van raspberrypi naar pi-zero.
                ┌────────────────────────────────────────────────────────────────────┐
                │ Please note: RFCs mandate that a hostname's labels may contain     │
                │ only the ASCII letters 'a' through 'z' (case-insensitive),         │
                │ the digits '0' through '9', and the hyphen.                        │
                │ Hostname labels cannot begin or end with a hyphen.                 │
                │ No other symbols, punctuation characters, or blank spaces are      │
                │ permitted.                                                         │
                │                                                                    │
                │                               <Ok>                                 │
                └────────────────────────────────────────────────────────────────────┘

                     ┌──────────────────────────────────────────────────────────┐
                     │ Please enter a hostname                                  │
                     │                                                          │
                     │ pi-zero_________________________________________________ │
                     │                                                          │
                     │              <Ok>                  <Cancel>              │
                     └──────────────────────────────────────────────────────────┘
Nog een kleinigheid...
4 Performance Options: P2 GPU Memory kan de instelling van het GPU geheugen aangepast worden.
Het GPU geheugen wordt in hoofdzaak gebruikt voor de display, zie:
RaspberryPi documentation: Memory options
┌────────────────────┤ Raspberry Pi Software Configuration Tool (raspi-config) ├─────────────────────┐
│                                                                                                    │
│            P1 Overclock           Configure CPU overclocking                                       │
│            P2 GPU Memory          Change the amount of memory made available to the GPU            │
│            P3 Overlay File System Enable/disable read-only file system                             │
│            P4 Fan                 Set behaviour of GPIO fan                                        │
│                                                                                                    │
│                            <Select>                            <Back>                              │
└────────────────────────────────────────────────────────────────────────────────────────────────────┘

                ┌────────────────────────────────────────────────────────────────────┐
                │ How much memory (MB) should the GPU have?  e.g. 16/32/64/128/256   │
                │                                                                    │
                │ 16________________________________________________________________ │
                │                                                                    │
                │                 <Ok>                     <Cancel>                  │
                └────────────────────────────────────────────────────────────────────┘
5 Localisation Options:
┌────────────────────┤ Raspberry Pi Software Configuration Tool (raspi-config) ├─────────────────────┐
│                                                                                                    │
│                    L1 Locale       Configure language and regional settings                        │
│                    L2 Timezone     Configure time zone                                             │
│                    L3 Keyboard     Set keyboard layout to match your keyboard                      │
│                    L4 WLAN Country Set legal wireless channels for your country                    │
│                                                                                                    │
│                            <Select>                            <Back>                              │
└────────────────────────────────────────────────────────────────────────────────────────────────────┘

    ┌───────────────────────────────────┤ Configuring locales ├───────────────────────────────────┐
    │ Locales are a framework to switch between multiple languages and allow users to use their   │
    │ language, country, characters, collation order, etc.                                        │
    │                                                                                             │
    │ Please choose which locales to generate. UTF-8 locales should be chosen by default,         │
    │ particularly for new installations. Other character sets may be useful for backwards        │
    │ compatibility with older systems and software.                                              │
    │                                                                                             │
    │ Locales to be generated:                                                                    │
    │                                                                                             │
    │    [ ] All locales                                                                      ↑   │
    │    [ ] aa_ER UTF-8                                                                      ▒   │
    │    [ ] aa_ER@saaho UTF-8                                                                ▒   │
    │    [ ] an_ES ISO-8859-15                                                                ▒   │
    │    [ ] an_ES.UTF-8 UTF-8                                                                ↓   │
    │                                                                                             │
    │                          <Ok>                              <Cancel>                         │
    └─────────────────────────────────────────────────────────────────────────────────────────────┘
Selecteer:
[*] en_GB.UTF-8 UTF-8
[*] nl_NL.UTF-8 UTF-8
Geeft:
  ┌─────────────────────────────────────┤ Configuring locales ├─────────────────────────────────────┐
  │ Many packages in Debian use locales to display text in the correct language for the user. You   │
  │ can choose a default locale for the system from the generated locales.                          │
  │                                                                                                 │
  │ This will select the default language for the entire system. If this system is a multi-user     │
  │ system where not all users are able to speak the default language, they will experience         │
  │ difficulties.                                                                                   │
  │                                                                                                 │
  │ Default locale for the system environment:                                                      │
  │                                                                                                 │
  │                                          None                                                   │
  │                                          C.UTF-8                                                │
  │                                          en_GB.UTF-8                                            │
  │                                          nl_NL.UTF-8                                            │
  │                                                                                                 │
  │                           <Ok>                               <Cancel>                           │
  └─────────────────────────────────────────────────────────────────────────────────────────────────┘
...even een 'terminal' scherm...
pi@raspberrypi:~ $ sudo raspi-config
Generating locales (this might take a while)...
  en_GB.UTF-8... done
  nl_NL.UTF-8... done
 ┌──────────────────────────────────────┤ Configuring tzdata ├──────────────────────────────────────┐
 │ Please select the geographic area in which you live. Subsequent configuration questions will     │
 │ narrow this down by presenting a list of cities, representing the time zones in which they are   │
 │ located.                                                                                         │
 │                                                                                                  │
 │ Geographic area:                                                                                 │
 │                                       Asia                                                       │
 │                                       Atlantic Ocean                                             │
 │                                       Europe                                                     │
 │                                       US                                                         │
 │                                       None of the above                                          │
 │                                                                                                  │
 │                           <Ok>                               <Cancel>                            │
 └──────────────────────────────────────────────────────────────────────────────────────────────────┘
                ┌───────────────────────┤ Configuring tzdata ├───────────────────────┐
                │ Please select the city or region corresponding to your time zone.  │
                │                                                                    │
                │ Time zone:                                                         │
                │                           Amsterdam       ↑                        │
                │                           Athens          ▒                        │
                │                           Belfast         ▒                        │
                │                           Belgrade        ▒                        │
                │                           Berlin          ▒                        │
                │                           Helsinki        ↓                        │
                │                                                                    │
                │                 <Ok>                     <Cancel>                  │
                └────────────────────────────────────────────────────────────────────┘
De volgende stap:
┌────────────────────┤ Raspberry Pi Software Configuration Tool (raspi-config) ├─────────────────────┐
│                                                                                                    │
│              A1 Expand Filesystem       Ensures that all of the SD card is available               │
│              A2 GL Driver               Enable/disable experimental desktop GL driver              │
│              A3 Compositor              Enable/disable xcompmgr composition manager                │
│              A4 Network Interface Names Enable/disable predictable network i/f names               │
│              A5 Network Proxy Settings  Configure network proxy settings                           │
│                                                                                                    │
│                            <Select>                            <Back>                              │
└────────────────────────────────────────────────────────────────────────────────────────────────────┘

                     ┌──────────────────────────────────────────────────────────┐
                     │                                                          │
                     │ Root partition has been resized.                         │
                     │ The filesystem will be enlarged upon the next reboot     │
                     │                                                          │
                     │                          <Ok>                            │
                     └──────────────────────────────────────────────────────────┘
Logfile van de optie Expand Filesystem:
Welcome to fdisk (util-linux 2.33.1).
Changes will remain in memory only, until you decide to write them.
Be careful before using the write command.

Command (m for help): Disk /dev/mmcblk0: 29 GiB, 31104958464 bytes, 60751872 sectors
Units: sectors of 1 * 512 = 512 bytes
Sector size (logical/physical): 512 bytes / 512 bytes
I/O size (minimum/optimal): 512 bytes / 512 bytes
Disklabel type: dos
Disk identifier: 0x83cedd43

Device         Boot  Start      End  Sectors  Size Id Type
/dev/mmcblk0p1        8192   532479   524288  256M  c W95 FAT32 (LBA)
/dev/mmcblk0p2      532480 60751871 60219392 28.7G 83 Linux

Command (m for help): Partition number (1,2, default 2):
Partition 2 has been deleted.

Command (m for help): Partition type
   p   primary (1 primary, 0 extended, 3 free)
   e   extended (container for logical partitions)
Select (default p): Partition number (2-4, default 2): First sector (2048-60751871, default 2048):
Last sector, +/-sectors or +/-size{K,M,G,T,P} (532480-60751871, default 60751871):
Created a new partition 2 of type 'Linux' and of size 28.7 GiB.
Partition #2 contains a ext4 signature.

Command (m for help):
Disk /dev/mmcblk0: 29 GiB, 31104958464 bytes, 60751872 sectors
Units: sectors of 1 * 512 = 512 bytes
Sector size (logical/physical): 512 bytes / 512 bytes
I/O size (minimum/optimal): 512 bytes / 512 bytes
Disklabel type: dos
Disk identifier: 0x83cedd43

Device         Boot  Start      End  Sectors  Size Id Type
/dev/mmcblk0p1        8192   532479   524288  256M  c W95 FAT32 (LBA)
/dev/mmcblk0p2      532480 60751871 60219392 28.7G 83 Linux

Command (m for help): The partition table has been altered.
Syncing disks.
Omdat ik de pi-zero als webserver gebruik, zonder display, kan het HDMI ciruit uitgeschakeld worden om stroom te besparen.
Zie artikel: Jeff Geerling: Raspberry Pi Zero - Conserve power, Disable HDMI, power saved: 25mA
pi@pi-zero::~ $ sudo /usr/bin/tvservice -o
Powering off HDMI

pi@pi-zero::~ $ sudo vi /etc/rc.local
#!/bin/sh -e
#
# rc.local
#
# This script is executed at the end of each multiuser runlevel.
# Make sure that the script will "exit 0" on success or any other
# value on error.
...
exit 0
/usr/bin/tvservice -o
~
~
"/etc/rc.local" 21 lines, 898964 characters

pi@pi-zero::~ $ dmesg | grep MIPS
[    0.001722] Calibrating delay loop... 697.95 BogoMIPS (lpj=3489792)
De volgende stap is het up-to-date brengen van de software.
pi@pi-zero:~ $ sudo apt-get update
Hit:1 http://raspbian.raspberrypi.org/raspbian buster InRelease
Hit:2 http://archive.raspberrypi.org/debian buster InRelease
Reading package lists... Done

pi@pi-zero:~ $ sudo apt-get upgrade -y
Reading package lists... Done
Building dependency tree
Reading state information... Done
Calculating upgrade... Done
The following packages will be upgraded:
  apt apt-utils base-files bind9-host bluez-firmware ca-certificates device-tree-compiler distro-info-data
  dphys-swapfile file firmware-atheros firmware-brcm80211 firmware-libertas firmware-misc-nonfree firmware-realtek
  iproute2 libapt-inst2.0 libapt-pkg5.0 libbind9-161 libdns-export1104 libdns1104 libfreetype6 libfreetype6-dev
  libgnutls30 libgssapi-krb5-2 libisc-export1100 libisc1100 libisccc161 libisccfg163 libjpeg62-turbo libk5crypto3
  libkrb5-3 libkrb5support0 libldap-2.4-2 libldap-common liblwres161 libmagic-mgc libmagic1 libp11-kit0
  libpam-systemd libpolkit-agent-1-0 libpolkit-backend-1-0 libpolkit-gobject-1-0 libraspberrypi-bin libraspberrypi-dev
  libraspberrypi-doc libraspberrypi0 libsqlite3-0 libssl1.1 libsystemd0 libudev1 libx11-6 libx11-data libxml2 libzstd1
  openssl policykit-1 python-apt-common python-rpi.gpio python3-apt raspberrypi-bootloader raspberrypi-kernel
  raspberrypi-sys-mods rpi-eeprom rpi.gpio-common sudo systemd systemd-sysv tzdata udev unzip
71 upgraded, 0 newly installed, 0 to remove and 0 not upgraded.
Need to get 156 MB of archives.
After this operation, 7,848 kB of additional disk space will be used.
Get:1 http://archive.raspberrypi.org/debian buster/main armhf libssl1.1 armhf 1.1.1d-0+deb10u5+rpt1 [1,276 kB]
Get:6 http://archive.raspberrypi.org/debian buster/main armhf bluez-firmware all 1.2-4+rpt8 [175 kB]
Get:7 http://archive.raspberrypi.org/debian buster/main armhf openssl armhf 1.1.1d-0+deb10u5+rpt1 [807 kB]

...

Processing triggers for dbus (1.12.20-0+deb10u1) ...
Processing triggers for install-info (6.5.0.dfsg.1-4+b1) ...
Processing triggers for mime-support (3.62) ...
Processing triggers for initramfs-tools (0.133+deb10u1) ...
Processing triggers for ca-certificates (20200601~deb10u2) ...
Updating certificates in /etc/ssl/certs...
0 added, 0 removed; done.
Running hooks in /etc/ca-certificates/update.d...
done.
De update en upgrade duurde ca 20 minuten.
De laatste stap: toevoegen aliassen, even uncomment ll (# verwijderen), toevoegen alias h='history'
pi@pi-zero:~ $ vi .bashrc
...
# some more ls aliases
alias ll='ls -l'
#alias la='ls -A'
#alias l='ls -CF'
alias h='history'
alias lt='ls -lrt | last'
...
Doordat de default hostname van de software, raspberrypi in de setup is gewijzigd naar pi-zero komt er op de Chromebook een foutmelding.
Het "ECDSA key" certificaat van de "raspberrypi" is anders dan van de "pi-zero" met een identiek ip-adres.
Zie ook: WikiPedia: ECDSA is "Elliptic Curve Digital Signature Algorithm"
Voorbeeld:
Connecting to pi@pi-zero...
@@@@@@@@@@@@@@@@@@@@@@@@@@@@@@@@@@@@@@@@@@@@@@@@@@@@@@@@@@@
@       WARNING: POSSIBLE DNS SPOOFING DETECTED!          @
@@@@@@@@@@@@@@@@@@@@@@@@@@@@@@@@@@@@@@@@@@@@@@@@@@@@@@@@@@@
The ECDSA host key for pi-zero has changed,
and the key for the corresponding IP address 192.168.178.63
is unchanged. This could either mean that
DNS SPOOFING is happening or the IP address for the host
and its host key have changed at the same time.
Offending key for IP in /.ssh/known_hosts:4
@@@@@@@@@@@@@@@@@@@@@@@@@@@@@@@@@@@@@@@@@@@@@@@@@@@@@@@@@@@
@    WARNING: REMOTE HOST IDENTIFICATION HAS CHANGED!     @
@@@@@@@@@@@@@@@@@@@@@@@@@@@@@@@@@@@@@@@@@@@@@@@@@@@@@@@@@@@
IT IS POSSIBLE THAT SOMEONE IS DOING SOMETHING NASTY!
Op de Chromebook wordt dit opgelost door het ssh programma te deïnstalleren en opnieuw te installeren.
Zie: Chromebook: remote ssh ... check foutmelding!
Met nieuwere versies van de Secure Shell kunnen (anno 2024) ook oude verbindingen verwijderd worden!
| Hoofdstuk: | Doel: |
|---|---|
| Informatie | Domoticz is a very light weight home automation system |
| Installatie | "curl" installatie script van website |
| Configuratie | Setup taal en locatie |
| Devices | Toevoegen randapparatuur |
| Devicetegel grijs | Database aanpassen, watersensor |
| Devicetegel rood | Time-out aanpassen |

PDF documentatie: domoticz.com DomoticzManual
Handleiding voor de Raspberry Pi, zie:
Domoticz.com Install Domoticz - The "easy" way:
After setting up the operating system of your choice, you are now ready to install Domoticz. Assuming your Linux is Debian-based, like Raspbian or Ubuntu, installing Domoticz is extremely easy. Just open a terminal window and execute this command: curl -L https://install.domoticz.com | bash
pi@pi-zero:~ $ curl -L https://install.domoticz.com | bash
  % Total    % Received % Xferd  Average Speed   Time    Time     Time  Current
                                 Dload  Upload   Total   Spent    Left  Speed
100 16569  100 16569    0     0  43833      0 --:--:-- --:--:-- --:--:-- 43833
:::
::: Script called with non-root privileges. The Domoticz installs server packages and configures
::: system networking, it requires elevated rights. Please check the contents of the script for
::: any concerns with this requirement. Please be sure to download this script from a trusted source.
:::
::: Detecting the presence of the sudo utility for continuation of this install...
::: Utility sudo located.
:::
::: You are root.
::: Verifying free disk space...
:::
::: apt-get update has not been run today. Running now... done!
:::
::: Checking apt-get for upgraded packages.... done!
:::
::: Your system is up to date! Continuing with Domoticz installation...
:::    Checking for apt-utils... installed!
:::    Checking for whiptail... installed!
:::    Checking for git... installed!
:::    Checking for curl... installed!
:::    Checking for unzip... installed!
:::    Checking for wget... installed!
:::    Checking for sudo... installed!
:::    Checking for cron... installed!
:::    Checking for libudev-dev... installed!
:::    Checking for libcurl4... installed!
:::    Checking for libusb-0.1... installed!
::: Downloading Domoticz
::: Current User: pi
HTTP Port:  8080
HTTPS Port:  443
:::
::: Destination folder=/home/pi/domoticz
::: Creating /home/pi/domoticz
--2021-04-21 14:49:39--  http://www.domoticz.com/download.php?channel=release&type=release&system=linux&machine=armv7l
Herleiden van www.domoticz.com (www.domoticz.com)... 2606:4700:3031::6815:a7f, 2606:4700:3036::ac43:be28, 172.67.190.40, ...
Verbinding maken met www.domoticz.com (www.domoticz.com)|2606:4700:3031::6815:a7f|:80... verbonden.
...
Verbinding maken met releases.domoticz.com (releases.domoticz.com)|146.185.159.228|:443... verbonden.
HTTP-verzoek is verzonden; wachten op antwoord... 200 OK
Lengte: 15743330 (15M) [application/octet-stream]
Wordt opgeslagen als: ‘domoticz_release.tgz’

domoticz_release.tgz      100%[====================================>]  15,01M  2,30MB/s    in 6,6s

2021-04-21 14:51:57 (2,27 MB/s) - '‘domoticz_release.tgz’' opgeslagen [15743330/15743330]

::: Unpacking Domoticz...
domoticz
History.txt
License.txt
domoticz.sh
server_cert.pem
...

dzVents/documentation/history.md
dzVents/documentation/pandoc.md
dzVents/documentation/README.wiki
dzVents/documentation/dzvents-smoothing.png
dzVents/documentation/README.md
Creating database...
::: Restarting services...
:::
::: Enabling domoticz.sh service to start on reboot... done.
:::
::: Starting domoticz.sh service... done.
::: done.
:::
::: Installation Complete! Configure your browser to use the Domoticz using:
:::     192.168.178.25:8080
:::     192.168.178.25:443
Halverwege de installatie komen er een paar opties zoals de /home directory, en de netwerkpoorten.
Zie de volgende opties:
Welcome
                ┌──────────────────┤ Domoticz automated installer ├──────────────────┐
                │                                                                    │
                │ This installer will transform your device into a Home Automation   │
                │ System!                                                            │
                │                                                                    │
                │ Domoticz is free, but powered by your donations at:                │
                │ http://www.domoticz.com                                            │
                │                                                                    │
                │ Domoticz is a SERVER so it needs a STATIC IP ADDRESS to function   │
                │ properly.                                                          │
                │                                                                    │
                │                               <Ok>                                 │
                └────────────────────────────────────────────────────────────────────┘

                ┌────────────────────────────────────────────────────────────────────┐
                │ Select Services (press space to select)                            │
                │                                                                    │
                │    [*] HTTP   Enables HTTP access                                  │
                │    [*] HTTPS  Enabled HTTPS access                                 │
                │                                                                    │
                │                 <Ok>                     <Cancel>                  │
                └────────────────────────────────────────────────────────────────────┘

                ┌─────────────────────────┤ Configure HTTP ├─────────────────────────┐
                │ HTTP Port number:                                                  │
                │                                                                    │
                │ 8080______________________________________________________________ │
                │                                                                    │
                │                 <Ok>                     <Cancel>                  │
                └────────────────────────────────────────────────────────────────────┘

                ┌────────────────────────┤ Configure HTTPS ├─────────────────────────┐
                │ HTTPS Port number:                                                 │
                │                                                                    │
                │ 443_______________________________________________________________ │
                │                                                                    │
                │                 <Ok>                     <Cancel>                  │
                └────────────────────────────────────────────────────────────────────┘

                ┌──────────────────────────┤ Destination ├───────────────────────────┐
                │ Installation Folder:                                               │
                │                                                                    │
                │ /home/pi/domoticz_________________________________________________ │
                │                                                                    │
                │                 <Ok>                     <Cancel>                  │
                └────────────────────────────────────────────────────────────────────┘

Ready...
                ┌─────────────────────┤ Installation Complete! ├─────────────────────┐
                │ Point your browser to either:                                      │
                │                                                                    │
                │ HTTP:   192.168.178.25:8080                                        │
                │ HTTPS:  192.168.178.25:443                                         │
                │                                                                    │
                │ Wiki:  https://www.domoticz.com/wiki                               │
                │ Forum: https://www.domoticz.com/forum                              │
                │                                                                    │
                │ The install log is in /etc/domoticz.                               │
                │                                                                    │
                │                               <Ok>                                 │
                └────────────────────────────────────────────────────────────────────┘
Resultaat: domoticz "home" directory
pi@pi-zero:~ $ pwd
/home/pi
pi@pi-zero:~ $ ll
totaal 4
drwxr-xr-x 7 pi pi 4096 apr 21 15:01 domoticz
pi@pi-zero:~ $ cd domoticz
pi@pi-zero:~/domoticz $ ll
totaal 14152
drwxr-xr-x 121 pi   pi       4096 apr 13 12:40 Config
-rw-r-----   1 root root      236 apr 21 15:01 domocookie.txt
-rwxr-xr-x   1 pi   pi   14577080 apr 17 20:13 domoticz
-rw-r--r--   1 pi   pi     401408 apr 21 15:00 domoticz.db
-rw-r--r--   1 pi   pi      32768 apr 21 15:00 domoticz.db-shm
-rw-r--r--   1 pi   pi      16512 apr 21 15:01 domoticz.db-wal
-rw-r--r--   1 pi   pi       4433 nov  9 13:47 domoticz.sh
drwxr-xr-x   4 pi   pi       4096 nov  9 13:47 dzVents
-rw-r--r--   1 pi   pi     102838 apr 17 17:29 History.txt
-rw-r--r--   1 pi   pi      35147 nov  9 13:47 License.txt
drwxr-xr-x   4 pi   pi       4096 nov  9 13:47 plugins
drwxr-xr-x   8 pi   pi       4096 nov  9 13:47 scripts
-rw-r--r--   1 pi   pi       3414 nov  9 13:47 server_cert.pem
-rwxr-xr-x   1 pi   pi        779 nov 29 11:09 updatebeta
-rwxr-xr-x   1 pi   pi        799 nov 29 11:09 updaterelease
drwxr-xr-x  13 pi   pi       4096 feb 19 08:48 www
pi@pi-zero:~/domoticz $ head domoticz.sh
#! /bin/sh
### BEGIN INIT INFO
# Provides:          domoticz
# Required-Start:    $network $remote_fs $syslog $time
# Required-Stop:     $network $remote_fs $syslog
# Default-Start:     2 3 4 5
# Default-Stop:      0 1 6
# Short-Description: Home Automation System
# Description:       This daemon will start the Domoticz Home Automation System
### END INIT INFO
Resultaat: het start scherm in een (Chromebook) browser, nog zonder sensors etc.
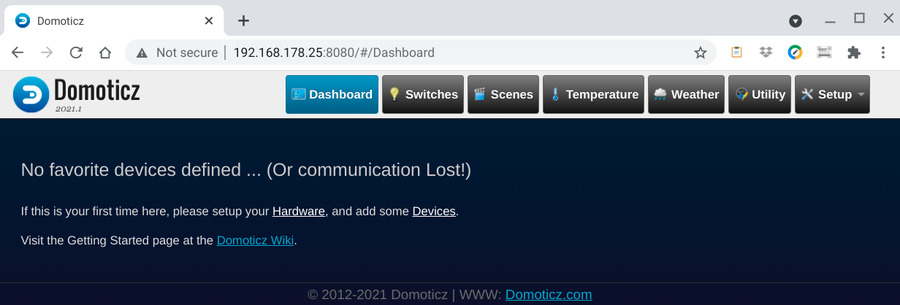
Voorbeeld: System Setup

Als bij de Location een adres wordt opgegeven, komt er een button voor de latitude en longitude.
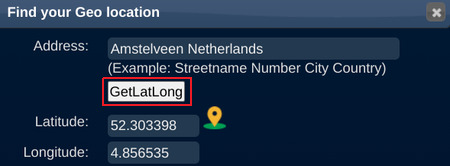
Hier staat ook beschreven om de pi aan te passen, zodat Domoticz start na het booten van het systeem.
Zie: Domoticz wiki: Starting Domoticz automatically when the system boots
Achteraf bleek, dat Domoticz automatisch op start na een reboot.
De Raspberry Pi afsluiten kan het beste via het Domoticz menu: via Setup
![]() More Options
More Options
![]() Shutdown System
Shutdown System
Opmerkingen: Met Google worden de nodige pagina's gevonden met opstart problemen met Domoticz.
Aangezien het lichtnet zeer betrouwbaar is, is het geen ramp als Domoticz niet automatisch start. Domoticz draait toch continue!
Bij problemen is het zinvol om het syslog te checken, met tail /var/log/syslog , eventueel tail -f ...
Een aandachtspunt is de configuratie van Python.sudo apt-get update sudo apt-get install gitDe Domoticz logfile geeft: via Setup
2021-03-08 14:28:04.615 Status: Domoticz V2020.2 (c)2012-2020 GizMoCuz
2021-03-08 14:28:04.620 Status: Build Hash: b63341bc0, Date: 2020-04-26 13:47:55
2021-03-08 14:28:04.621 Status: Startup Path: /home/pi/domoticz/
2021-03-08 14:28:05.125 Active notification Subsystems: fcm, http (2/13)
2021-03-08 14:28:05.261 Starting shared server on: :::6144
2021-03-08 14:28:05.068 Status: PluginSystem: Failed dynamic library load, install the latest libpython3.x library that is available for your platform.
2021-03-08 14:28:05.151 Status: WebServer(HTTP) started on address: :: with port 8080
2021-03-08 14:28:05.228 Status: WebServer(SSL) started on address: :: with port 443
...
Python check en installatie:
pi@pi-zero:~ $ python3 -V
Python 3.7.3

pi@pi-zero:~ $ dpkg --get-selections | grep libpython
libpython-stdlib:armhf                          install
libpython2-stdlib:armhf                         install
libpython2.7-minimal:armhf                      install
libpython2.7-stdlib:armhf                       install
libpython3-stdlib:armhf                         install
libpython3.7:armhf                              install
libpython3.7-minimal:armhf                      install
libpython3.7-stdlib:armhf                       install

pi@pi-zero:~ $ sudo apt-get install python3.7 libpython3.7 python3.7-dev
Pakketlijsten worden ingelezen... Klaar
Boom van vereisten wordt opgebouwd
De statusinformatie wordt gelezen... Klaar
libpython3.7 is reeds de nieuwste versie (3.7.3-2+deb10u2).
libpython3.7 staat ingesteld op handmatig geïnstalleerd.
python3.7 is reeds de nieuwste versie (3.7.3-2+deb10u2).
python3.7 staat ingesteld op handmatig geïnstalleerd.
De volgende NIEUWE pakketten zullen geïnstalleerd worden:
  libexpat1-dev libpython3.7-dev python3.7-dev
0 opgewaardeerd, 3 nieuw geïnstalleerd, 0 te verwijderen en 0 niet opgewaardeerd.
Er moeten 47,8 MB aan archieven opgehaald worden.
Na deze bewerking zal er 72,2 MB extra schijfruimte gebruikt worden.
Ophalen:1 http://mirror.serverius.net/raspbian/raspbian buster/main armhf libexpat1-dev armhf 2.2.6-2+deb10u1 [127 kB]
Ophalen:2 http://mirror.serverius.net/raspbian/raspbian buster/main armhf libpython3.7-dev armhf 3.7.3-2+deb10u2 [47,2 MB]
Ophalen:3 http://mirror.serverius.net/raspbian/raspbian buster/main armhf python3.7-dev armhf 3.7.3-2+deb10u2 [522 kB]
47,8 MB opgehaald in 16s (2966 kB/s)
...

pi@pi-zero:~ $ sudo systemctl restart domoticz.service
Check via de Domoticz http://192.168.178.25:8080/#/About interface geeft: Python Version: 3.7.3 (default, Jan 22 2021, 20:04:44) [GCC 8.3.0]
De consequenties van de nieuwe stringentere beveiligingen van de browsers is een foutmelding
Doordat het certificaat van Domoticz niet bekend is in de Chrome of Firefox browser, moet een "insecure" verbinding ingesteld worden, en krijg je meldingen als:

Your connection is not private
Attackers might be trying to steal your information from 192.168.178.25 (for example, passwords, messages, or credit cards).
Dan de melding:Een klik op deze melding geeft:
Subject: *.domoticz.com
Issuer: *.domoticz.com
Expires on: May 20, 2025
Current date: Apr 13, 2022
PEM encoded chain:
-----BEGIN CERTIFICATE-----
MIIDmjCCAoICCQCY2Jha...
...
Tv+I9/FcpxWtlvQySP8=
-----END CERTIFICATE-----
To get Chrome’s highest level of security, turn on enhanced protection
This server could not prove that it is 192.168.178.25; its security certificate is not trusted by your computer's operating system.
This may be caused by a misconfiguration or an attacker intercepting your connection.
Proceed to 192.168.178.25 (unsafe)
Resultaat: "Not secure" melding op de adresbalk

Info: Domoticz.com Native secure access with Lets Encrypt
Domoticz includes a SSL certificate generated for the *.domoticz.com domain. So for your own domain, it may result some warning error by your browser.
Het aanpassen van de site met een SSL certificate is nogal omslachtig. Sneller: uitschakelen HTTPS!
Opmerking: HTTPS is uitgeschakeld in de zomer van 2023, zie: Blog > oktober 2023
Nadat Domoticz is geïnstalleerd en geconfigureerd is als eerste de slimme elektriciteitsmeter toegevoegd.
De micro-USB poort wordt gebruikt voor een interface naar de elektriciteit / gas meter.De eerste stap is het toevoegen van hardware via de "instellingen" tab, Naam en Type, dan Baudrate, zie:
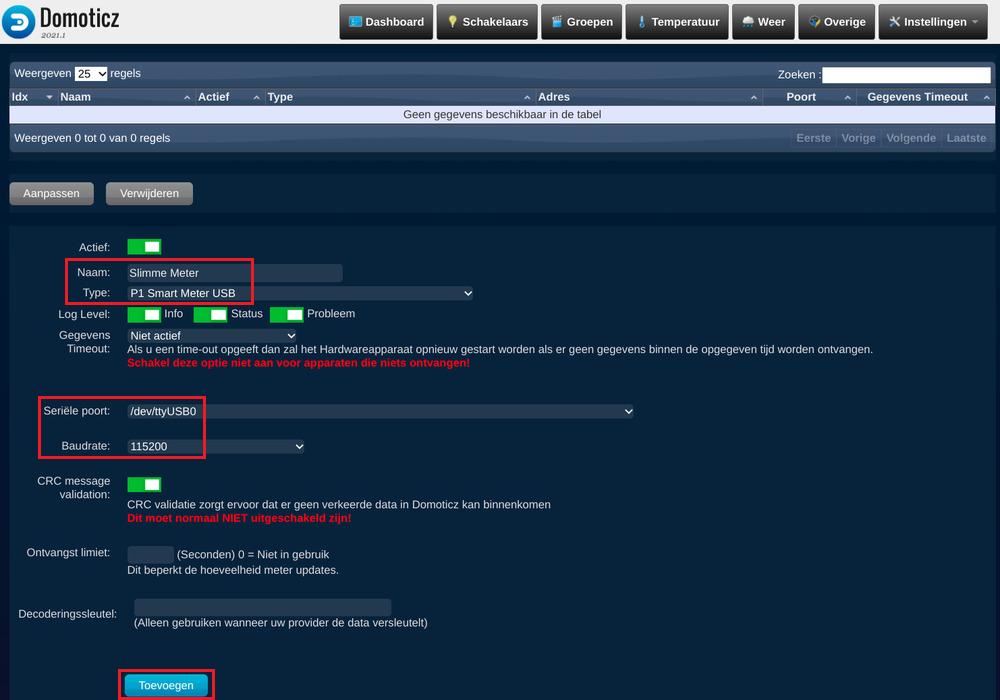
Resultaat: Instellingen, Hardware

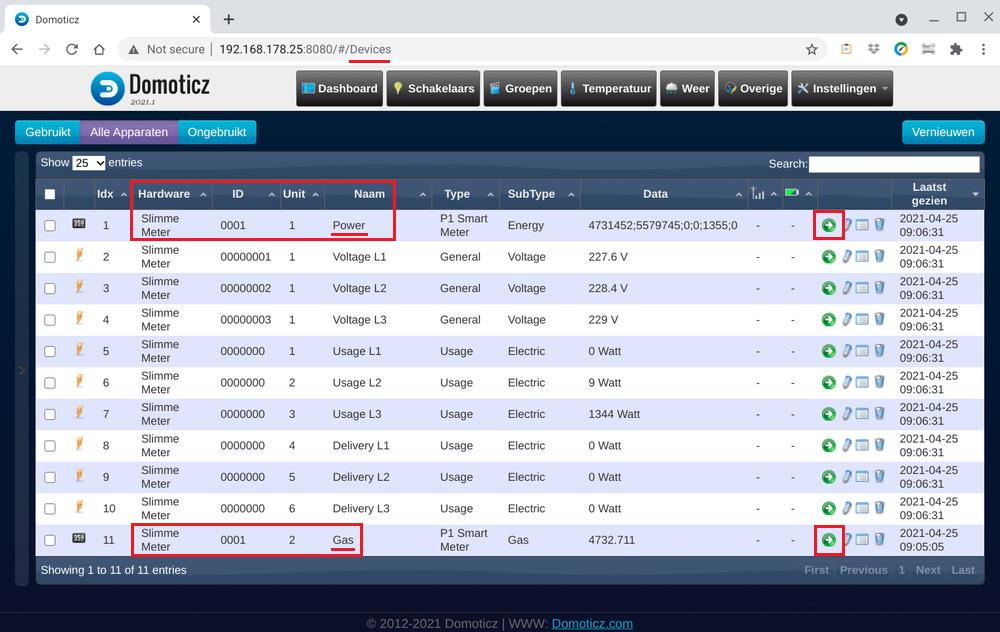
Met de groene pijl (toevoegen), rechts, komt het "Device / Apparaat" in het Overige menu van Domoticz.
Er komt een pop-up met "Power" en "Gas" toevoegen, groene pijl naar rechts wordt blauwe pijl naar links.
Resultaat:

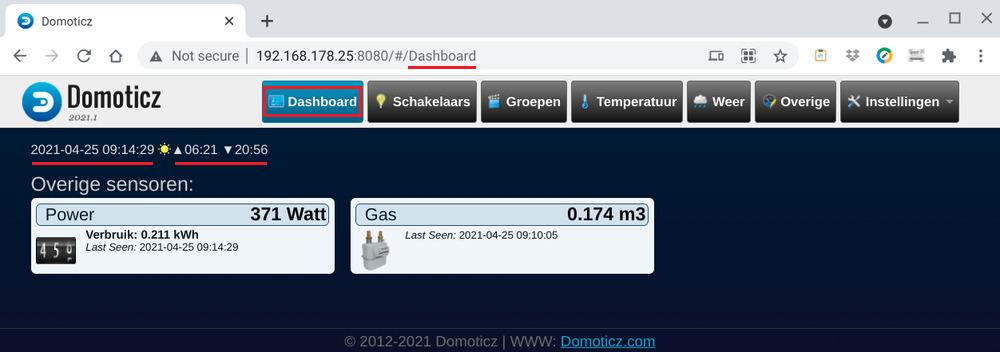
Met de "ster" komt het Apparaat in het "Dashboard" van Domoticz.
Resultaat:
Op het Dashboard zie je ook de actuele tijd, en de tijd van zonsopgang en zonsondergang.
De Raspberry Pi heeft een flink aantal "GPIO" = General Purpose Input/Output aansluitingen. In mijn geval worden de de aansluiting gebruikt voor:
 Informatie:
Zeer uitgebreide informatie over de Pi-zero en de interfacing staat op de site:
gpiozero: A simple interface to GPIO devices with Raspberry Pi
Ook de installatie en andere (spi interface) worden uitgebreid behandeld.
Voorbeelden input en output op de pi:
Inleiding:
De water meter heeft een vaantje, die per liter een omwenteling maakt.
Dit vaantje wordt gedetecteerd door een magnetische sensor die een puls afgeeft.
Voor het uitlezen van de water opnemer wordt een python script gebruikt.
Opmerking: Ik gebruikte een sensor met een gevoeligheid van 4 mm. Dit is nogal kritisch.
Waarschijnlijk geeft een vergelijkbare 8 mm sensor eerder het gewenste resultaat!
http://192.168.178.25:8080/json.htm?type=createvirtualsensor&idx=29&sensorname=Water&sensortype=113Resultaat:
{
	"idx" : "12",
	"status" : "OK",
	"title" : "CreateVirtualSensor"
}
Het "watermeter.py" script wordt van de Asus-Chromebook met "scp" naar de pi-zero gekopieerd:
fritsvleeuwen@penguin:~$ scp watermeter.py pi@pi-zero:/home/pi/domoticz/scripts/
pi@pi-zero's password: *****
watermeter.py                                      100% 2364   178.6KB/s   00:00
http://192.168.178.25:8080/json.htm?type=setused&idx=12&name=RFXMeter&switchtype=2&used=trueResultaat:
{
	"status" : "OK",
	"title" : "SetUsed"
}
De "bron" code van het python script is:
pi@pi-zero:~ $ cat /home/pi/domoticz/scripts/watermeter.py #!/usr/bin/python import RPi.GPIO as GPIO import time import urllib2 import os #Watermeter stand (wordt alleen initeel gebruikt als er geen bestand meterstand_water.txt is) global Counter Counter = 0 #Domoticz URL domoticz_url = "http://192.168.178.25:8080" #Domoticz IDX van de water sensor (RFXMeter) idx = 12 #Open meterstand.txt file en lees meterstand #Als meterstand.txt niet aanwezig is maakt script bestand aan en vult de meterstand fn = "/home/pi/domoticz/scripts/meterstand_water.txt" if os.path.exists(fn): f = file(fn, "r+") f = open(fn) inhoud = f.readline() a,b,c = inhoud.split() Counter = int(c) else: f = open(fn, "w") f.write( 'meterstand = ' + repr(Counter)) f.close() #Board is pin nr, BMC is GPIO nr #Read output from water meter op pin 40 GPIO.setmode(GPIO.BOARD) # Set GPIO 21 (Pin 40) als Input aditioneel als Pullup-Weerstand aktiveren GPIO.setup(40, GPIO.IN, pull_up_down = GPIO.PUD_DOWN) #Functie callback #Dit is de functie die aangeroepen wordt in de interrupt def Interrupt(channel): print('Callback function called!') time.sleep(0.05) # need to filter out the false positive of some power fluctuation if GPIO.input(40) == 0: print('quitting event handler because this was probably a false positive') return #Teller elke interrupt uitlezen en met 0.5 liter verhogen (deler watermeter op 10 zetten) file(fn, "r+") f = open(fn) inhoud = f.readline() a,b,c = inhoud.split() Counter = int(c) Counter = Counter + 1 f.close() #Schrijf meterstand naar bestand f = open( fn, 'w') f.write( 'meterstand = ' + repr(Counter)) f.close() #Send counter to domoticz JSON url1 = domoticz_url+'/json.htm?type=command¶m=udevice&idx='+str(idx)+'&svalue='+str(Counter) req1 = urllib2.Request(url1) response1 = urllib2.urlopen(req1) #Voor debug => print voorbeeld van de JSON aanroep en/of de counter print "JSON call = "+ str(url1) print "Watermeter Counter = " + str(Counter) #Interrupt-Event toevoegen, sensor geeft een 0 en en bij detectie een 1 #Bij detectie een 1 daarom check stijgende interrupt. GPIO.add_event_detect(40, GPIO.RISING, callback = Interrupt, bouncetime = 200) try: while True: time.sleep(0.2) except KeyboardInterrupt: GPIO.cleanup() print "\nBye"
Aanpassingen in bovenstaand script:
Uitvoeren script:
pi@pi-zero:~ $ sudo python /home/pi/domoticz/scripts/watermeter.py
Volgende stap: script toevoegen aan crontab, voor opstarten script, direct na boot van de pi-zero:
pi@pi-zero:~ $ sudo crontab -e
no crontab for root - using an empty one

Select an editor.  To change later, run 'select-editor'.
  1. /bin/nano        <---- easiest
  2. /usr/bin/vim.tiny
  3. /bin/ed

Choose 1-3 [1]: 2

# Edit this file to introduce tasks to be run by cron.
#
# Each task to run has to be defined through a single line
# indicating with different fields when the task will be run
# and what command to run for the task
#
@reboot /usr/bin/python /home/pi/domoticz/scripts/watermeter.py >/var/log/cronlog.log 2>&1
~
~
-- INSERT --
:wq!

crontab: installing new crontab
Tenslotte: de deelfactor 1000 voor liters naar m3 instellen via het Domoticz menu
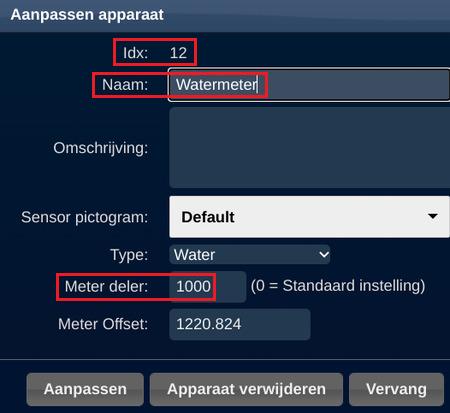
Opmerking: Bij de herinstallatie gebruikte ik de "Naam" Water. Het "Dashboard" van Domoticz geeft dan: Power, Gas, Water
De volgende stap is het toevoegen van hardware via de "instellingen" tab, na de slimme meter in menu.
Invullen bij Naam: "Huiskamer-THB" (Temperatuur, Humidity, Barometer)
Type: Dummy (Does nothing, use for virtual switches only)
Resultaat:
Het aanmaken van een 'virtual sensor' in Domoticz stap 1:
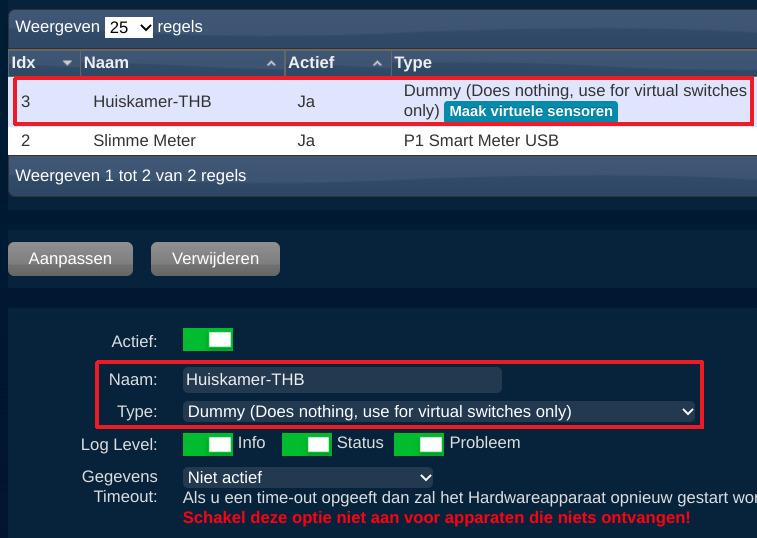
Volgende stap: druk op Maak virtuele sensoren (bovenstaande afbeelding!)
Resultaat
De "Huiskamer-THB" komt nu in de kolom: "Hardware"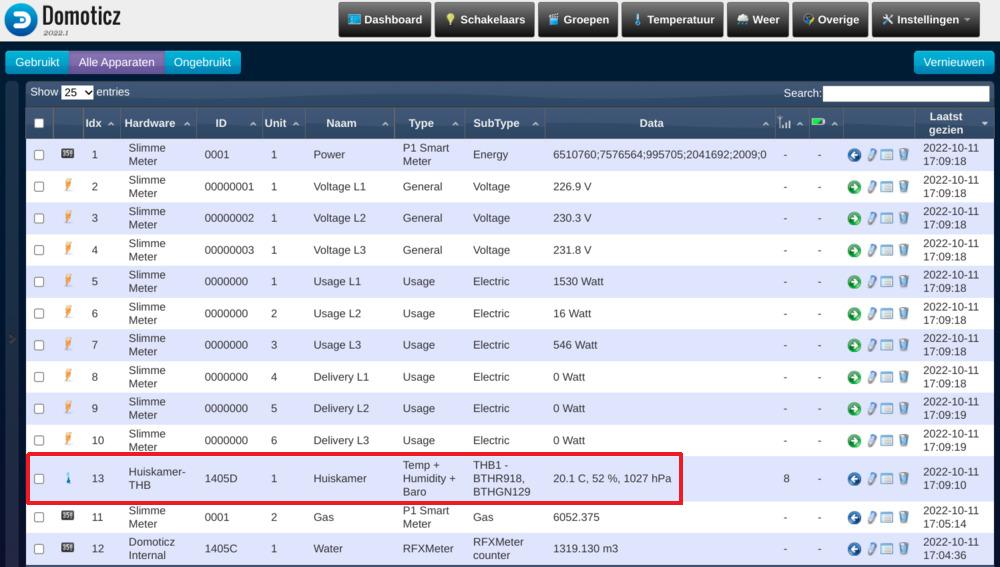
Resultaat: "Dashboard", temperatuur, vochtigheid en luchtdruk toegevoegd!
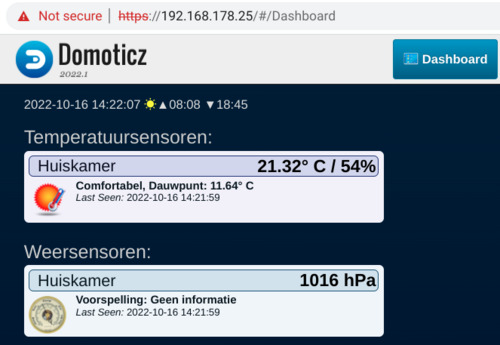
In februari 2022 was er een probleem met de internetverbinding met de FRITZ!Box.
"Normaal" wordt een haperende verbinding opgelost door een 'Opnieuw verbinden' commando.
Hierdoor wordt de internetverbinding kort verbroken en vervolgens automatisch opnieuw tot stand gebracht.
In dit geval was het laden van de fabrieksinstellingen (in overleg met de helpdesk) de oplossing.
Helaas was dat een probleem voor de Raspberry Pi Zero Wireless, die als Domoticz server wordt gebruikt.
Door de herstart van de FRITZ!Box kreeg de Pi een nieuw IP-adres van de DHCP-server.
Na de herstart krijgen de computers in het netwerk een nieuw IP adres vanaf 192.168.178.20 op volgorde van aanmelden op de modem.
Hierna was de Domoticz server niet meer bereikbaar, en dus was een nieuwe installatie nodig.
Leermomentje: de volgende keer eerst even een backup van de FRITZ!Box configuratie maken!
De backup komt in de download map van de computer/laptop/Chromebook! Dan even uploaden naar de FRITZ!Box USB-stick
Achteraf ... het IP adres van de Raspberry Pi kan ook in de FRITZ!Box worden vrijgegeven, zie blog Blog maart 2022
 Anno 2022: nieuwe versies van Debian en Domoticz!
 Anno 2022: nieuwe versies van Debian en Domoticz geven een probleem met de default versie 3 van Python!
De consequenties van de nieuwe versie van Python is, dat het watermeter script niet meer werkt.
Het lukte niet om dit script werkend te krijgen. Ook een Python utility 2to3 om het oude script aan te passen naar Python 3 werkte niet.
De download van de oude Raspberry Pi Zero 32 bit versie stond nog in de download map van de "Giga" computer!
De image file is met balenaEtcher: "Flash Flawless" software geïnstalleerd op een 32 GB microSD card.
De balenaEtcher software kan het "zip" bestand uitpakken.
frits@giga: ~/Downloads $ ls -lrt
...
...
-rw-rw-r--  1 frits frits  459635953 mrt 12  2021 2021-01-11-raspios-buster-armhf-lite.zip

frits@giga: ~/Downloads $ cd /opt
./balenaEtcher-1.5.109-x64.AppImage

< balenaEtcher start window, voor selectie Bron: download bestand en Doel: opslag microSD ... vervolgens --->

frits@giga: ~/Downloads $ cd /media/frits/boot

frits@giga: ~/media/frits/boot $ touch ssh
frits@giga: ~/media/frits/boot $ vi wpa_supplicant.conf
frits@giga: ~/media/frits/boot $ ls -lrt|tail
...
-rw-r--r-- 1 frits frits    2075 jan 28 02:04 config.txt
-rw-r--r-- 1 frits frits     145 jan 28 02:22 issue.txt
-rw-r--r-- 1 frits frits       0 feb 18 18:44 ssh
-rw-r--r-- 1 frits frits     137 feb 18 18:46 wpa_supplicant.conf
frits@giga: ~/media/frits/boot $ cd
frits@giga: ~ $ umount /dev/sdb1
frits@giga: ~ $ umount /dev/sdb2
Zie voor details: Installatie
Stappen:pi@raspberrypi:~ $ passwd Changing password for pi. Current password: raspberry New password: <geheim> Retype new password: <geheim> passwd: password updated successfully
Opstarten configuratie:
pi@raspberrypi:~ $ sudo raspi-config
S4 Hostname: Set name for this computer on a network, in mijn geval host='pi-zero'
P2 GPU Memory: Change the amount of memory made available to the GPU
How much memory (MB) should the GPU have? e.g. 16/32/64/128/256, in mijn geval ('headless'=zonder beeldscherm) 16__ MB
5 Localisation Options Configure language and regional settings
L1 Locale: Configure language and regional settings:
default: [*] en_GB.UTF-8 UTF-8
toegevoegd: [*] nl_NL.UTF-8 UTF-8
L2 Timezone: Configure time zone aangepast naar ![]() Amsterdam
Amsterdam
Resultaat:
Current default time zone: 'Europe/Amsterdam'
Local time is now:      Sun Feb 20 17:24:17 CET 2022.
Universal Time is now:  Sun Feb 20 16:24:17 UTC 2022.
6 Advanced Options: Configure advanced settings
A1 Expand Filesystem: Ensures that all of the SD card is available
8 Update: Update this tool to the latest version
pi@pi-zero:~ $ sudo apt-get update
Geraakt:1 http://raspbian.raspberrypi.org/raspbian bullseye InRelease
Geraakt:2 http://archive.raspberrypi.org/debian bullseye InRelease
Pakketlijsten worden ingelezen... Klaar

pi@pi-zero:~ $ sudo apt-get upgrade -y
Pakketlijsten worden ingelezen... Klaar
Boom van vereisten wordt opgebouwd... Klaar
De statusinformatie wordt gelezen... Klaar
Opwaardering wordt doorgerekend... Klaar
pi@pi-zero:~ $ curl -L https://install.domoticz.com | bash
  % Total    % Received % Xferd  Average Speed   Time    Time     Time  Current
                                 Dload  Upload   Total   Spent    Left  Speed
100 16582  100 16582    0     0  50096      0 --:--:-- --:--:-- --:--:-- 49945
:::
::: Script called with non-root privileges. The Domoticz installs server packages and configures
::: system networking, it requires elevated rights. Please check the contents of the script for
::: any concerns with this requirement. Please be sure to download this script from a trusted source.
:::
::: Detecting the presence of the sudo utility for continuation of this install...
::: Utility sudo located.
:::
::: You are root.
::: Verifying free disk space...
:::
::: Checking apt-get for upgraded packages.... done!   <--- al uitgevoerd!

...

::: Downloading Domoticz
::: Current User: pi
HTTP Port:  8080
HTTPS Port:  443
:::
::: Destination folder=/home/pi/domoticz
::: Creating /home/pi/domoticz
Bij Chrome OS had ik deze melding al vaker.
Vroeger (tot 2015) kon dit opgelost worden met een commando in de Chromebook terminal: ssh_forget_host
fritsvleeuwen@penguin:~$ scp watermeter.py pi@pi-zero:/home/pi/domoticz/scripts/
@@@@@@@@@@@@@@@@@@@@@@@@@@@@@@@@@@@@@@@@@@@@@@@@@@@@@@@@@@@
@       WARNING: POSSIBLE DNS SPOOFING DETECTED!          @
@@@@@@@@@@@@@@@@@@@@@@@@@@@@@@@@@@@@@@@@@@@@@@@@@@@@@@@@@@@
The ECDSA host key for pi-zero has changed,
and the key for the corresponding IP address 192.168.178.25
has a different value. This could either mean that
DNS SPOOFING is happening or the IP address for the host
and its host key have changed at the same time.
Offending key for IP in /home/fritsvleeuwen/.ssh/known_hosts:2
  remove with:
  ssh-keygen -f "/home/fritsvleeuwen/.ssh/known_hosts" -R "192.168.178.25"
@@@@@@@@@@@@@@@@@@@@@@@@@@@@@@@@@@@@@@@@@@@@@@@@@@@@@@@@@@@
@    WARNING: REMOTE HOST IDENTIFICATION HAS CHANGED!     @
@@@@@@@@@@@@@@@@@@@@@@@@@@@@@@@@@@@@@@@@@@@@@@@@@@@@@@@@@@@
IT IS POSSIBLE THAT SOMEONE IS DOING SOMETHING NASTY!
Someone could be eavesdropping on you right now (man-in-the-middle attack)!
It is also possible that a host key has just been changed.
The fingerprint for the ECDSA key sent by the remote host is
SHA256:abcdefghijklmnopqrstuvwxyz1234567890.
Please contact your system administrator.
Add correct host key in /home/fritsvleeuwen/.ssh/known_hosts to get rid of this message.
Offending ECDSA key in /home/fritsvleeuwen/.ssh/known_hosts:3
  remove with:
  ssh-keygen -f "/home/fritsvleeuwen/.ssh/known_hosts" -R "pi-zero"
ECDSA host key for pi-zero has changed and you have requested strict checking.
Host key verification failed.
lost connection
Aangezien in nu in Debian werk op de Asus Chromebook kan bovenstaand commando eenvoudig uitgevoerd worden!
pi@pi-zero:~ $ python3 -V
Python 3.9.2
Overzicht geïnstalleerde bestanden:
pi@pi-zero:~ $ apt list --installed|grep python

WARNING: apt does not have a stable CLI interface. Use with caution in scripts.

libpython3-stdlib/stable,now 3.9.2-3 armhf [geïnstalleerd,automatisch]
libpython3.9-dev/stable,now 3.9.2-1+rpi1 armhf [geïnstalleerd,automatisch]
libpython3.9-minimal/stable,now 3.9.2-1+rpi1 armhf [geïnstalleerd,automatisch]
libpython3.9-stdlib/stable,now 3.9.2-1+rpi1 armhf [geïnstalleerd,automatisch]
libpython3.9/stable,now 3.9.2-1+rpi1 armhf [geïnstalleerd]
python-apt-common/stable,now 2.2.1 all [geïnstalleerd,automatisch]
python-is-python3/stable,now 3.9.2-1 all [geïnstalleerd]
...
Het script van de watermeter is in versie Python-2 geschreven.
Er is een hulpprogramma om Python-2 programma's om te zetten naar Python-3, zie:
docs.python.org 2to3 library Automated Python 2 to 3 code translation.
2to3 is a Python program that reads Python 2.x source code and applies a series of fixers to transform it into valid Python 3.x code.
Geïnstalleerd: pi@pi-zero:~ $ sudo apt-get install 2to3
Uitgevoerd: pi@pi-zero:~/domoticz/scripts $ 2to3 -w watermeter.py
Het is niet gelukt om de watermeter.py om te zetten met het 2to3 programma: toch nog een foutmelding.
Uiteindelijk Python2 geïnstalleerd.
Installatie:
Opmerking: als laatste stap in op de eerste regel van het script de versie 2.7 toegevoegd!#!/usr/bin/env python import RPi.GPIO as GPIO import time import urllib2 import os ...
Bij de vorige setup - Debian-Buster - was het nog mogelijk om de TVservice uit te schakelen, aangezien ik geen display heb aangesloten.
Bij de nieuwe versie van het OS, Debian-Bullseye is dit (nog?) niet meer mogelijk.
 Aan het eind van de maand november kreeg ik een pop-up bij het openen van de Domoticz webpagina, met de optie van een update.
Aankondiging: Domoticz.com forum: Domoticz version 2022.2 released [Saturday 05 November 2022]
Hello Everyone! ... After hundreds of beta versions its once again time for a new stable release!
As always, PLEASE make a FULL backup of your Domoticz folder (or in case of an embedded system, your SD card!)
This way you can always return to the previous version you were running before this update!
Voorbereidingen:
ECDSA key "fingerprint":
pi@pi-zero:~$ ssh pi@odroid-hc
The authenticity of host 'odroid-hc (192.168.178.40)' can't be established.
ECDSA key fingerprint is SHA256:ABCDEFGHIJKLMNOPQRSTUVWXYZ+-1234567890acbce.
Are you sure you want to continue connecting (yes/no)? yes
Warning: Permanently added 'odroid-hc,192.168.178.40' (ECDSA) to the list of known hosts.
pi@odroid-hc's password:
...
Details:
pi@pi-zero:~$ sudo apt install mono-complete -y
Reading package lists... Done
Building dependency tree
Reading state information... Done
The following additional packages will be installed:
  binfmt-support cli-common fontconfig-config fonts-dejavu-core javascript-common libcairo2 libexif12 libfontconfig1 libgdiplus libgif7 libjbig0 libjs-xmlextras
...
0 upgraded, 191 newly installed, 0 to remove and 0 not upgraded.
Need to get 76.3 MB of archives.
After this operation, 252 MB of additional disk space will be used.
Get:1 http://archive.raspberrypi.org/debian buster/main armhf libpixman-1-0 armhf 0.36.0-1+rpt1 [476 kB]
...
E: Unable to fetch some archives, maybe run apt-get update or try with --fix-missing?
pi@pi-zero:~$ sudo apt install ca-certificates-mono -y
Reading package lists... Done
Building dependency tree
Reading state information... Done
The following additional packages will be installed:
  binfmt-support cli-common libmono-btls-interface4.0-cil libmono-corlib4.5-cil libmono-i18n-west4.0-cil libmono-i18n4.0-cil libmono-security4.0-cil
...
0 upgraded, 19 newly installed, 0 to remove and 0 not upgraded.
Need to get 0 B/6,330 kB of archives.
After this operation, 21.6 MB of additional disk space will be used.
...
Setting up ca-certificates-mono (5.18.0.240+dfsg-3) ...
Setting up libmono-system-xml4.0-cil (5.18.0.240+dfsg-3) ...
Setting up mono-4.0-gac (5.18.0.240+dfsg-3) ...
Setting up mono-gac (5.18.0.240+dfsg-3) ...
...
Running hooks in /etc/ca-certificates/update.d...
Updating Mono key store
Mono Certificate Store Sync - version 5.18.0.240
Populate Mono certificate store from a concatenated list of certificates.
Copyright 2002, 2003 Motus Technologies. Copyright 2004-2008 Novell. BSD licensed.

Importing into legacy system store:
I already trust 0, your new list has 137
Certificate added: CN=ACCVRAIZ1, OU=PKIACCV, O=ACCV, C=ES
Certificate added: C=ES, O=FNMT-RCM, OU=AC RAIZ FNMT-RCM
Certificate added: C=IT, L=Milan, O=Actalis S.p.A./03358520967, CN=Actalis Authentication Root CA
Certificate added: C=US, O=AffirmTrust, CN=AffirmTrust Commercial
...
137 new root certificates were added to your trust store.
Import process completed.
Done
done.
Processing triggers for mime-support (3.62) ...
Processing triggers for libc-bin (2.28-10+rpt2+rpi1) ...
pi@pi-zero:~$ wget https://github.com/duplicati/duplicati/releases/download/v2.0.5.1-2.0.5.1_beta_2020-01-18/duplicati_2.0.5.1-1_all.deb
--2023-01-01 16:38:56--  https://github.com/duplicati/duplicati/releases/download/v2.0.5.1-2.0.5.1_beta_2020-01-18/duplicati_2.0.5.1-1_all.deb
Resolving github.com (github.com)... 140.82.121.3
Connecting to github.com (github.com)|140.82.121.3|:443... connected.
HTTP request sent, awaiting response... 302 Found
Location: https://objects.githubusercontent.com/github-production-release-asset-2e65be/22636263/d5cae680-39f0-11ea-8193-4a299944e5f2?X-Amz-Algorithm=AWS4-HMAC-
...
Connecting to objects.githubusercontent.com (objects.githubusercontent.com)|185.199.111.133|:443... connected.
HTTP request sent, awaiting response... 200 OK
Length: 9205824 (8.8M) [application/octet-stream]
Saving to: ‘duplicati_2.0.5.1-1_all.deb’

duplicati_2.0.5.1-1_all.deb              100%[======================================>]   8.78M  2.24MB/s    in 4.3s

2023-01-01 16:39:01 (2.04 MB/s) - ‘duplicati_2.0.5.1-1_all.deb’ saved [9205824/9205824]
pi@pi-zero:~$ sudo apt-get install ./duplicati_2.0.5.1-1_all.deb -y
Reading package lists... Done
Building dependency tree
Reading state information... Done
Note, selecting 'duplicati' instead of './duplicati_2.0.5.1-1_all.deb'
The following additional packages will be installed:
  adwaita-icon-theme at-spi2-core dbus-user-session dconf-gsettings-backend dconf-service fontconfig fontconfig-config
...
Suggested packages:
  apache2 | lighttpd | httpd libdigest-hmac-perl libgssapi-perl colord cups-common gvfs liblcms2-utils libcrypt-ssleay-perl libgnomeui-0 libnunit-doc
  monodoc-nunit-manual monodoc-gtk3.0-manual librsvg2-bin libauthen-ntlm-perl libxml-sax-expatxs-perl monodoc-gtk-manual monodoc-gecko-manual
Recommended packages:
  libgluezilla
The following NEW packages will be installed:
  adwaita-icon-theme at-spi2-core dbus-user-session dconf-gsettings-backend
...
0 upgraded, 290 newly installed, 0 to remove and 0 not upgraded.
Need to get 37.8 MB/111 MB of archives.
After this operation, 375 MB of additional disk space will be used.
...
E: Unable to fetch some archives, maybe run apt-get update or try with --fix-missing?
pi@pi-zero:~$ sudo apt update --fix-missing
Get:1 http://raspbian.raspberrypi.org/raspbian buster InRelease [15.0 kB]
Get:2 http://archive.raspberrypi.org/debian buster InRelease [32.6 kB]
Get:3 http://raspbian.raspberrypi.org/raspbian buster/main armhf Packages [13.0 MB]
Get:4 http://archive.raspberrypi.org/debian buster/main armhf Packages [392 kB]
Fetched 13.5 MB in 29s (464kBs)
Reading package lists... Done
Building dependency tree
Reading state information... Done
98 packages can be upgraded. Run 'apt list --upgradable' to see them.
pi@pi-zero:~$ sudo apt upgrade
Reading package lists... Done
Building dependency tree
Reading state information... Done
Calculating upgrade... Done
The following packages will be upgraded:
  base-files bind9-host bluez bzip2 cifs-utils curl dbus distro-info-data dpkg dpkg-dev git git-man gzip isc-dhcp-client isc-dhcp-common libbind9-161 libbz2-1.0
...
98 upgraded, 0 newly installed, 0 to remove and 0 not upgraded.
Need to get 196 MB of archives.
After this operation, 1,382 kB of additional disk space will be used.
Do you want to continue? [Y/n] Y
Get:1 http://archive.raspberrypi.org/debian buster/main armhf libc6-dbg armhf 2.28-10+rpt2+rpi1+deb10u1 [10.7 MB]
Get:8 http://mirror.nl.leaseweb.net/raspbian/raspbian buster/main armhf perl-base armhf 5.28.1-6+deb10u1 [1,352 kB]
...
Get:97 http://archive.raspberrypi.org/debian buster/main armhf multiarch-support armhf 2.28-10+rpt2+rpi1+deb10u1 [216 kB]
Get:98 http://archive.raspberrypi.org/debian buster/main armhf rpi-eeprom armhf 13.12-1~buster [1,847 kB]
Fetched 196 MB in 1min 35s (2,076 kB/s)
Reading changelogs... Done
Extracting templates from packages: 100%
Preconfiguring packages ...
(Reading database ... 41643 files and directories currently installed.)
...
Setting up bzip2 (1.0.6-9.2~deb10u2) ...
Setting up locales (2.28-10+rpt2+rpi1+deb10u1) ...
Generating locales (this might take a while)...
  en_GB.UTF-8... done
  nl_NL.UTF-8... done
Generation complete.
Setting up libpython3.7-minimal:armhf (3.7.3-2+deb10u4) ...
Setting up raspberrypi-kernel (1:1.20220308~buster-1) ...
...
Setting up libdbus-1-3:armhf (1.12.24-0+deb10u1) ...
Setting up dbus (1.12.24-0+deb10u1) ...
A reboot is required to replace the running dbus-daemon.
Please reboot the system when convenient.
Setting up xz-utils (5.2.4-1+deb10u1) ...
Setting up libfribidi0:armhf (1.0.5-3.1+deb10u2) ...
Setting up sudo (1.8.27-1+deb10u4) ...
..
Processing triggers for man-db (2.8.5-2) ...
Processing triggers for install-info (6.5.0.dfsg.1-4+b1) ...
Processing triggers for mime-support (3.62) ...
todo
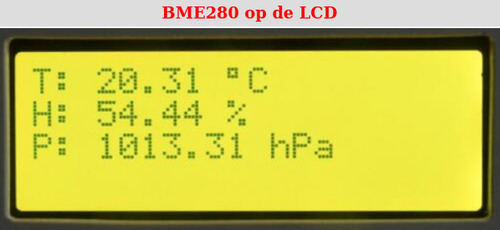
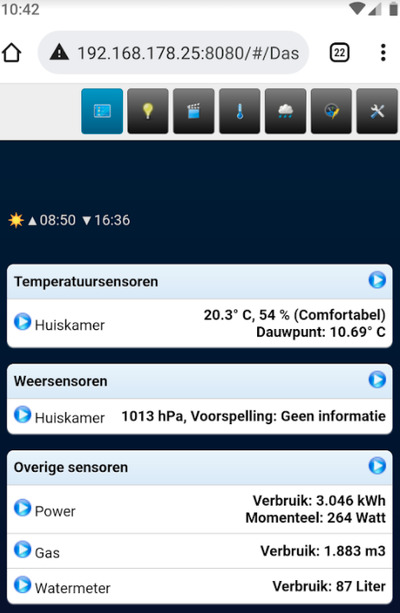
De resultaten van de "slimme" meter en de BME280 temperatuur / vochtigheid / luchtdruk opnemer zijn zichtbaar op de Chromebook en de Fairphone.
De metingen van de ESP-1: BME280 sensor zijn zichtbaar op een ESP-1: LCD scherm.
 |
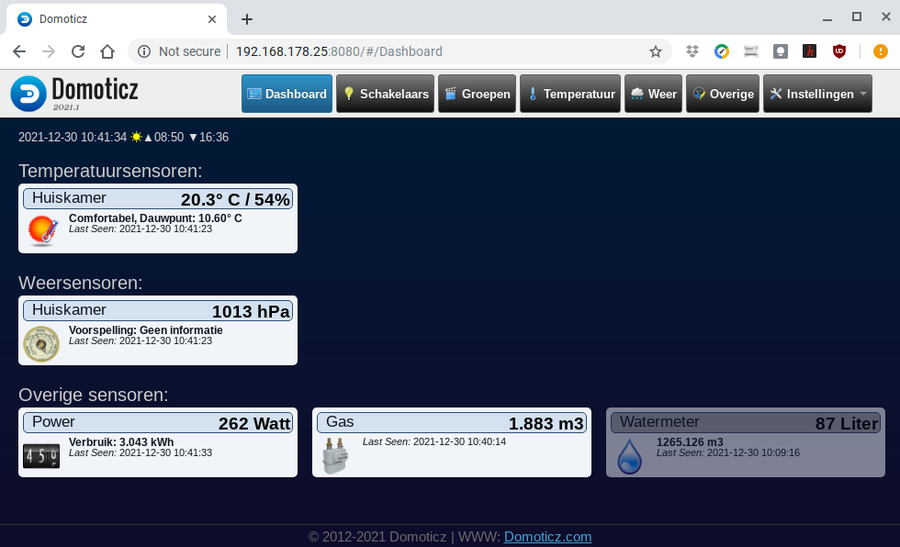 |
Opmerking: soms is de watermeter iets grijs. In dit geval is er een langere tijd geen puls gegeven door de opnemer.
Na de nieuwe FRITZ!Box kon ik geen verbinding maken met de Chromebook naar de "pi-zero".
Nadat ik een nieuwe image had opgeslagen en na de configuratie van de MicroSD kaart had ik nog geen verbinding.Uitgevoerd:
frits@giga:~$ df -h
Bestandssysteem Grootte Gebruikt Besch Geb% Aangekoppeld op
udev               974M        0  974M   0% /dev
tmpfs              200M     1,4M  198M   1% /run
/dev/sda1          456G     320G  113G  74% /
tmpfs              997M      75M  922M   8% /dev/shm
tmpfs              5,0M     4,0K  5,0M   1% /run/lock
tmpfs              997M        0  997M   0% /sys/fs/cgroup
...
tmpfs              200M      16K  200M   1% /run/user/1000
/dev/sdb1          253M      46M  207M  18% /media/frits/boot    <--- NB!
/dev/sdb2           29G     1,3G   26G   5% /media/frits/rootfs  <--- NB!

frits@giga:~$ umount /dev/sdb1
frits@giga:~$ umount /dev/sdb2
Tijdens het toevoegen van de gasmeter aan Domoticz kreeg ik de volgende foutmelding:
2021-04-04 14:34:16.137 Error: P1 Smart Meter: Unable to synchronize to the gas meter clock because it is more than 5 minutes ahead of my time
Het blijkt, dat de software image van de Raspberry Pi standaard stond ingesteld op "BST": British Summer Time
pi@pi-zero:~ $ date
Sun  4 Apr 14:42:07 BST 2021
Tijdens de setup van de Raspberry Pi: "raspi-config", kan de tijdzone op Europa/Amsterdam ingesteld worden.

Bovenstaande instelling is essentieel om met de Chromebook verbinding te maken met de Domoticz computer!
In het verleden had ik een keer een probleem met het herstarten van Domoticz via het menu in de webserver.
Een andere optie is, om Domoticz te stoppen via de command prompt.
Na een boot kan Domoticz ook via de command prompt gestart worden.
Als Domoticz dan nog niet start, check "status", kan een reboot uitgevoerd worden.
Info: Domoticz wiki: Manually controlling the Domoticz service
Commando's:sudo service domoticz.sh start sudo service domoticz.sh stop sudo service domoticz.sh restart sudo service domoticz.sh status sudo reboot
![]()
![]()