De ESP-2 is de tweede "peripheral" met ESP Easy software.
Deze is voorzien van een 5 volt passive piezoelectric beeper.
Het doel van de beeper is om een signaal af te geven als de voordeurbel gaat.
De voordeurbel is voorzien van een detector, die een signaal naar de Raspberry Py Zero geeft.
Dit signaal triggert in Domoticz een actie om op de ESP-2 en rtttl melodie af te spelen.
Info over RTTTL staat in: Wikipedia.org: Ring Tone Text Transfer Language ... was developed by Nokia to be used to transfer ringtones to cellphone by Nokia.
Een goed artikel over buzzers staat op de website:
diyi0t.com: Active and Passive Buzzer for Arduino, ESP8266 and ESP32
In this tutorial you learn how active and passive buzzer work and the differences between both buzzers.
Trick to differentiate between an active and passive buzzer: Connect the buzzer properly to a battery.
If the buzzer generates a sound, it is an active buzzer. If there is no sound, the buzzer is a passive buzzer.
In het artikel staat ook: Creating a Melody with a Passive Buzzer ... met een schema om op een Arduino aan te sluiten.
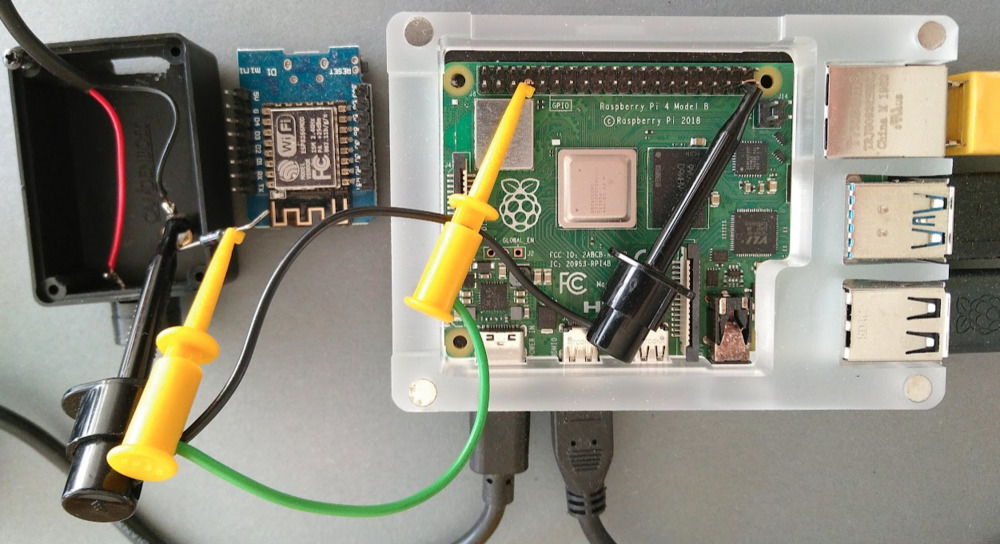
Om de beeper te testen is deze aangesloten op de Raspberry Pi 4
Een goed voorbeeld vond ik op de site:
CircuitBasics.com: HOW TO USE BUZZERS ON THE RASPBERRY PI
Buzzers are often used in DIY projects to create simple sounds for alarms and alerts.
In this tutorial, we will learn how to connect passive and active buzzers to a Raspberry Pi, and how to program them with Python
Twee andere relevante artikelen zijn:
Emariete.Com: Active or passive buzzer for Arduino, ESP8266, NodeMCU, ESP32, etc. Types of buzzers.
The first thing we need to know is that not all buzzers are the same.
We can differentiate them mainly by two characteristics: it is a active or passive buzzer?
Emariete.Com: Using a buzzer with ESPEasy
Sometimes we need our ESPEasy-based project to generate sound alerts, for warnings, alarms, confirmation of certain actions, or other reasons.
In this article, we will see, step by step, how we can add a buzzer to our project with ESPEasy.
Voordat de schakeling in een kleine behuizing wordt ingebouwd, is een check uitgevoerd met de Raspberry Pi 4
In het CircuitBasics artikel staan de aansluitingen en er is een simpel python programma om een melodie af te spelen.
Om hardware op de Pi aan te sluiten is een overzicht van de aansluitingen handig.
Deze staat op de website: pinout.xyz: The Raspberry Pi GPIO pinout guide.
Omdat de Wemos niet identiek is aan de Pi, is er een NPN transistor toegevoegd.
In het CircuitBasics artikel is de beeper direct op de output van de Pi aangesloten naar de 0 Volt.
In mijn geval wordt de beeper aangesloten tussen de collector van de BC... en de 5 Volt.
De beeper is van het merk EKULIT. Er staat geen type op de behuizing. Uit de 5 Volt DC test blijkt: passief! ... geen geluid.
CircuitBasics: Python broncode voor afspelen melodie op beeper: "SoundCheck.py"
import RPi.GPIO as GPIO
import time

BuzzerPin = 4

GPIO.setmode(GPIO.BCM)
GPIO.setup(BuzzerPin, GPIO.OUT)
GPIO.setwarnings(False)

global Buzz
Buzz = GPIO.PWM(BuzzerPin, 440)
Buzz.start(50)

B0=31
C1=33
CS1=35
D1=37
DS1=39
E1=41
F1=44
FS1=46
G1=49
GS1=52
A1=55
AS1=58
B1=62
C2=65
CS2=69
D2=73
DS2=78
E2=82
F2=87
FS2=93
G2=98
GS2=104
A2=110
AS2=117
B2=123
C3=131
CS3=139
D3=147
DS3=156
E3=165
F3=175
FS3=185
G3=196
GS3=208
A3=220
AS3=233
B3=247
C4=262
CS4=277
D4=294
DS4=311
E4=330
F4=349
FS4=370
G4=392
GS4=415
A4=440
AS4=466
B4=494
C5=523
CS5=554
D5=587
DS5=622
E5=659
F5=698
FS5=740
G5=784
GS5=831
A5=880
AS5=932
B5=988
C6=1047
CS6=1109
D6=1175
DS6=1245
E6=1319
F6=1397
FS6=1480
G6=1568
GS6=1661
A6=1760
AS6=1865
B6=1976
C7=2093
CS7=2217
D7=2349
DS7=2489
E7=2637
F7=2794
FS7=2960
G7=3136
GS7=3322
A7=3520
AS7=3729
B7=3951
C8=4186
CS8=4435
D8=4699
DS8=4978

song = [
  G4,
  E4, F4, G4, G4, G4,
  A4, B4, C5, C5, C5,
  E4, F4, G4, G4, G4,
  A4, G4, F4, F4,
  E4, G4, C4, E4,
  D4, F4, B3,
  C4
]

beat = [
  8,
  8, 8, 4, 4, 4,
  8, 8, 4, 4, 4,
  8, 8, 4, 4, 4,
  8, 8, 4, 2,
  4, 4, 4, 4,
  4, 2, 4,
  1
]

while True:
	for i in range(1, len(song)):
		Buzz.ChangeFrequency(song[i])
		time.sleep(beat[i]*0.13)
Het resultaat van de test is bevredigend.
Het geluid is duidelijk, en niet overdreven hard.
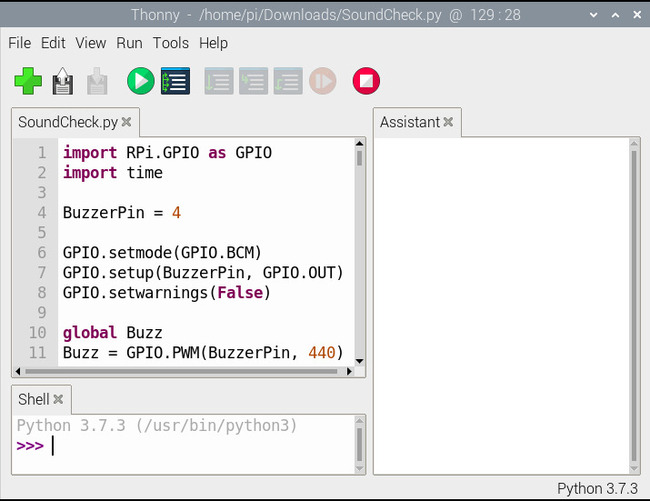

Een goed artikel over de IDE's van de Raspberry Pi is:
MakeUseOf.com: 5 Great Raspberry Pi IDEs For Programmers and Students
Planning to learn to program on Raspberry Pi? These Integrated Development Environments (IDEs) all run on Raspberry Pi OS.
Aan bod komen o.a.: Geany en Thonny. Beiden zijn standaard geïnstalleerd op de Pi.
De hardware is ingebouwd in een Camdenboss RX2007/S-5 behuizing van 46x32x20 mm, die gekozen is vanwege de afmetingen van de Wemos mini.
In de bodem is de Wemos, de beeper zit aan de bovenkant.
Aan de onderkant is een micro USB aansluiting van de Wemos voor de voeding.
Binnenshuis wordt een standaard USB lader gebruikt, buitenshuis, achter in de tuin een power-bank.
o-<rood>---------------- +5 Volt USB voeding
                |
                o +
Wemos         beeper
Output          o -
|               |
|              /
V   _____    |/
o--|_____|---|      BC517: "darlington-transistor"
R = 1 kOhm   |\
               V
               |
o-<zwart>--------------- 0 Volt
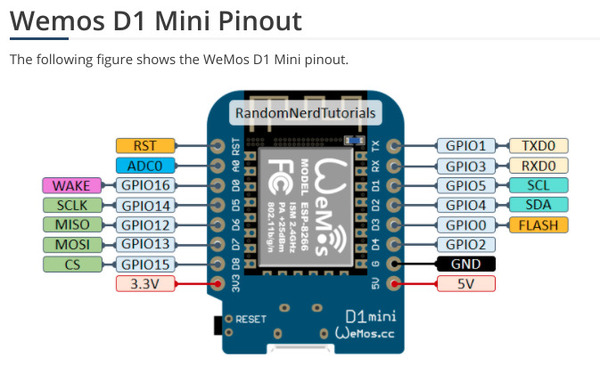
Opmerking: het is van belang om weten welke pinnen gebruikt moeten worden voor input of output.
Een gedetailleerd overzicht staat op de website:
RandomNerdTutorials: ESP8266 Pinout Reference: Which GPIO pins should you use?
GPIO4 and GPIO5 are the most safe to use GPIOs if you want to operate relays.
Zie ook: wwwdotorg.org: ESP8266 GPIO Behaviour at Boot
De beldetector is aangesloten op de Raspberry Pi Zero in de meterkast. Deze draait ook de Domoticz software.
De detector moet elektrisch gescheiden zijn van de Pi computer. Dit kan uitgevoerd worden met een optocoupler.
De eenvoudigste schakeling zag ik op website: TweakBlogs.net: Notificatie deurbel op je smartphone.
Een optocoupler en een weerstand zijn voldoende om een signaal aan de Pi te geven.
Het belsignaal van de transformator is ca 6 Volt. De detector krijgt ca 9 Volt piekspanning met een 50 Hz frequentie.
gpio export 23 in
gpio edge 23 both
gpio -g mode 23 up
Op de wiki van Domoticz staat meer informatie, zie: Domoticz-wiki.com: GPIO What is GPIO? IT stands for "general purpose input output".
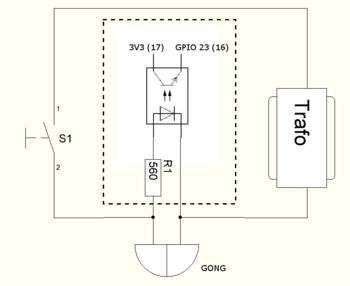 Ik gebruik de PC817 Optocoupler. Dit is een mini 4-pin DIP behuizing.

Domoticz en ESPEasy: Introduction

Domoticz.com: ESP Easy
is firmware that allows creating sensor nodes with wireless connection to a LAN via WiFi, without writing any code.
Domonicz supports connection to ESPEasy devices directly.
Om in de combinatie Domonicz en ESPEasy een schakelaar te definieeren staat beschreven op op de website:
LetsControlIt.com: Tutorial Domoticz Switch
This tutorial will guide you to connect your first ESP Easy switch to Domoticz. We expect that you have a working Domoticz setup and have loaded the ESP Easy firmware onto your ESP.
Opmerking: belangrijk is ook de
Domoticz-wiki.com: GPIO Configuration
Before starting Domoticz:
The pins you intend to use must be made available to unpriviledged processes (as Domoticz should not run with root priviledges).
To do so, you need to run a few commands before starting Domoticz.
Probably the best place is in /etc/rc.local
Uitgevoerd eerste stap:
pi@pi-zero:~ $ gpio -v -bash: gpio: command not foundpi@pi-zero:~ $ sudo apt-get install wiringpi Reading package lists... Done Building dependency tree Reading state information... Done The following NEW packages will be installed: wiringpi 0 upgraded, 1 newly installed, 0 to remove and 0 not upgraded. Need to get 52.9 kB of archives. After this operation, 0 B of additional disk space will be used. Get:1 http://archive.raspberrypi.org/debian buster/main armhf wiringpi armhf 2.50 [52.9 kB] Fetched 52.9 kB in 0s (275 kB/s) Selecting previously unselected package wiringpi. (Reading database ... 41392 files and directories currently installed.) Preparing to unpack .../wiringpi_2.50_armhf.deb ... Unpacking wiringpi (2.50) ... Setting up wiringpi (2.50) ... Processing triggers for man-db (2.8.5-2) ...pi@pi-zero:~ $ gpio -v gpio version: 2.50 Copyright (c) 2012-2018 Gordon Henderson This is free software with ABSOLUTELY NO WARRANTY. For details type: gpio -warranty Raspberry Pi Details: Type: Pi Zero-W, Revision: 01, Memory: 512MB, Maker: Sony * Device tree is enabled. *--> Raspberry Pi Zero W Rev 1.1 * This Raspberry Pi supports user-level GPIO access.
 ESP Easy heeft faciliteiten voor RTTTL, zie:
ESPEasy.ReadTheDocs: Buzzer (RTTTL)
ESP Easy heeft faciliteiten voor RTTTL, zie:
ESPEasy.ReadTheDocs: Buzzer (RTTTL)Rules examples:
From ESP Easy v2.0.0 its possible to play melodies via RTTTL ... zie voorbeeld
http://This plays a melody on pin 14./control?cmd=rtttl,14:d=4,o=5,b=112:8a,8a,a,8a,8a,a,8a,8c6,8f.,16g,2a,8a .....
Een nederlands talige beschrijving staat op de site: HuizeBruin.nl: Easy-ESP schakelaar toe te voegen aan Domoticz
De eerste stap is, de setup en netwerk configuratie van de ESP-Easy client, zie: ESP Easy: Configuratie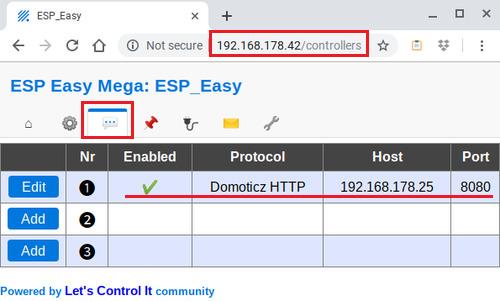
De volgende stappen:
Voor het dimensioneren van de voeding is het stroomverbruik van belang!
De Wemos verbruikt ca 60 mA tijdens de setup.
De meting is uitgevoerd met een "KWS-MX17" USB meter, zie: IoT: power
![]()
![]()